
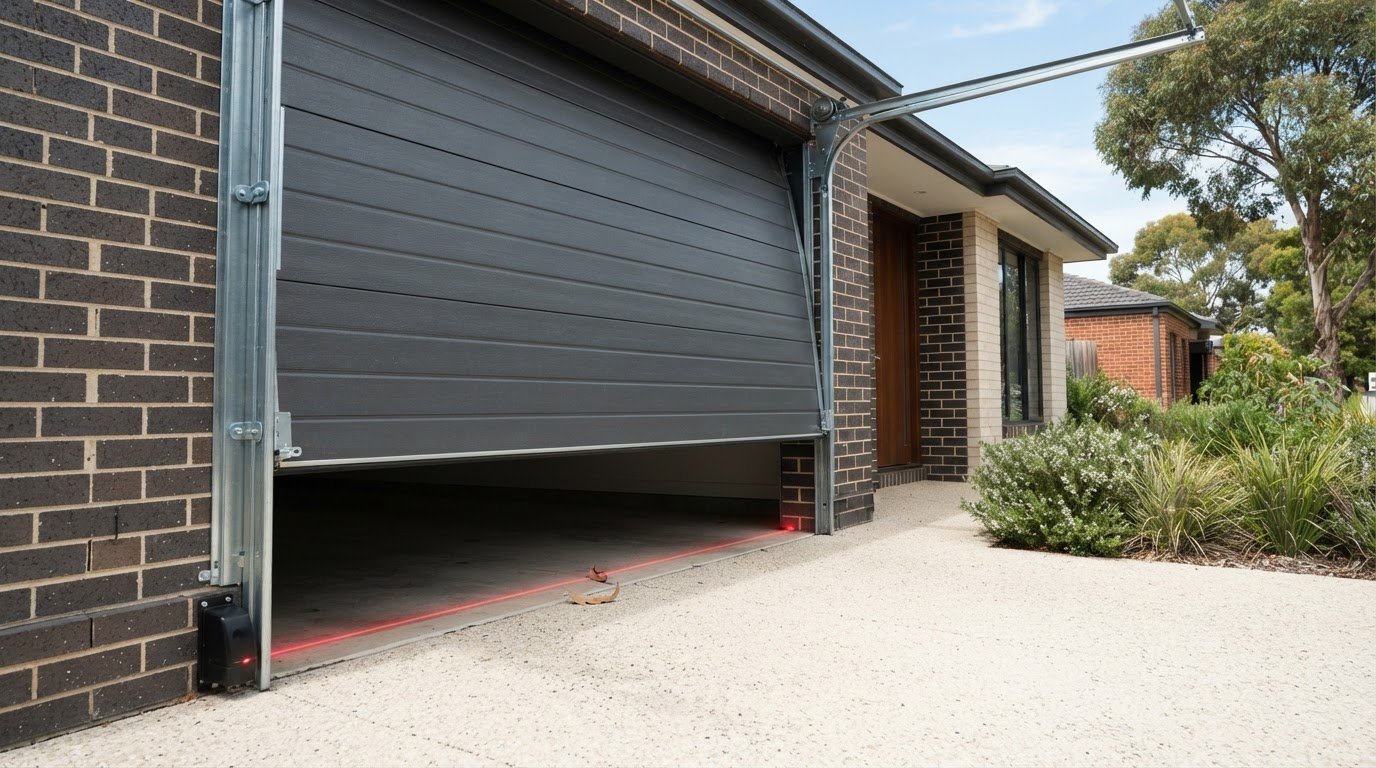
A garage door that reverses partway is often responding to a blocked safety sensor or resistance in its moving parts. If you’re asking, “why does my garage door stop before closing?”, check for an obstruction in the sensor beam, debris or damage along the tracks, or worn rollers and springs.
It’s frustrating when a door won’t shut, especially when you’re trying to secure your home. Reversing is a safety response, so don’t force the door or adjust springs and cables yourself. Careful visual checks may reveal a simple obstruction, but persistent problems can indicate a fault that needs a technician.
This guide explains how to check sensors and tracks safely, recognise signs of wear, and know when to stop troubleshooting and arrange professional help. Start with visible causes, then consider the parts that support the door’s weight.
Key Takeaways
- Look for anything interrupting the safety sensor beam, and check whether the sensor lights are steady.
- Inspect visible tracks and rollers for dirt, debris or damage, but don’t force a door that’s binding.
- Travel limits and force settings affect how the opener moves the door; avoid turning up the force to push through resistance.
- If the door feels unusually heavy or won’t stay in place when tested, stop and leave spring and cable adjustments to a technician.
- Use the symptoms and safe checks in the guide to decide whether the issue is a simple obstruction or needs professional repair.
Why does my garage door close halfway, then go back up?
An opener may reverse if its travel limits or force settings don’t match the door’s movement. Before checking any settings, note where the reversal occurs.
-
Check opener travel limits
Use the opener manual to locate the travel controls before changing anything. Travel limits tell the door where to stop as it opens and closes. If the closing limit is set incorrectly, the door may reach the floor, meet resistance and reverse. It may also stop short, leaving a gap underneath. Note where it stops on each attempt and compare the pattern with the manual. Don’t guess which way to turn a dial, as controls vary between opener models.
-
Review opener force settings
Check the force-setting label and manual, but don’t increase force just to make the door close. The opener uses force to detect resistance, so a setting that’s too low may trigger a reversal during normal movement. A setting that’s too high can mask resistance and create damage or safety risks. If adjustment is needed, make only small increases and never set the force excessively high. If the door still reverses or moves unevenly, the setting may not be the cause.
- Record where the door stops before considering an adjustment. Note whether it reverses at the same point each time or only near the floor. A consistent stopping point may indicate a travel-limit issue, while reversals at varying points can suggest changing resistance during movement. These observations help a technician without requiring you to alter the opener.
- Compare the door’s movement with the opener’s normal cycle. Watch from a safe distance as it starts closing, slows, stops or reverses. Note any unusual motor strain, jerky movement or stopping before the door reaches the floor. Don’t stand beneath the moving door or try to hold it in place. The pattern can help distinguish a setting issue from a mechanical problem.
- Use the opener manual to identify the travel-limit and force controls. Some models use buttons, while others have dials or different adjustment sequences. Identify the correct control before taking action, and don’t change both settings at once, or you won’t know which change affected the door. If the instructions don’t clearly match your opener, leave the settings alone.
- Stop troubleshooting the settings if the door keeps reversing after you’ve recorded its behaviour. An opener adjustment can’t fix every cause of resistance, and increasing the force too far can create a hazard. Tell a technician where the door stops, how it moves and whether the motor strains. These details can help guide a safe inspection of the opener and door.
Obstructions or damage in tracks and rollers
Resistance along the door’s path can trigger a reversal. Check for visible obstructions and roller problems before considering adjustments.
-
Check tracks for obstructions
From the floor, inspect both tracks for leaves, grit, spider webs or lodged objects. A small stone near a roller can interrupt smooth movement and make the door stop or reverse. Clear loose debris you can reach safely, but don’t bend a track or loosen its brackets. A kink or gap can affect roller movement and needs more than basic cleaning.
-
Inspect rollers for damage
With the door stationary, look along each side for rollers that appear cracked, worn, loose or out of position. During a normal cycle, listen for repeated scraping or grinding near one spot, which can help locate a roller that isn’t turning smoothly. Don’t put your fingers near moving parts or try to remove a roller. A roller that leaves its track can make the door unstable.
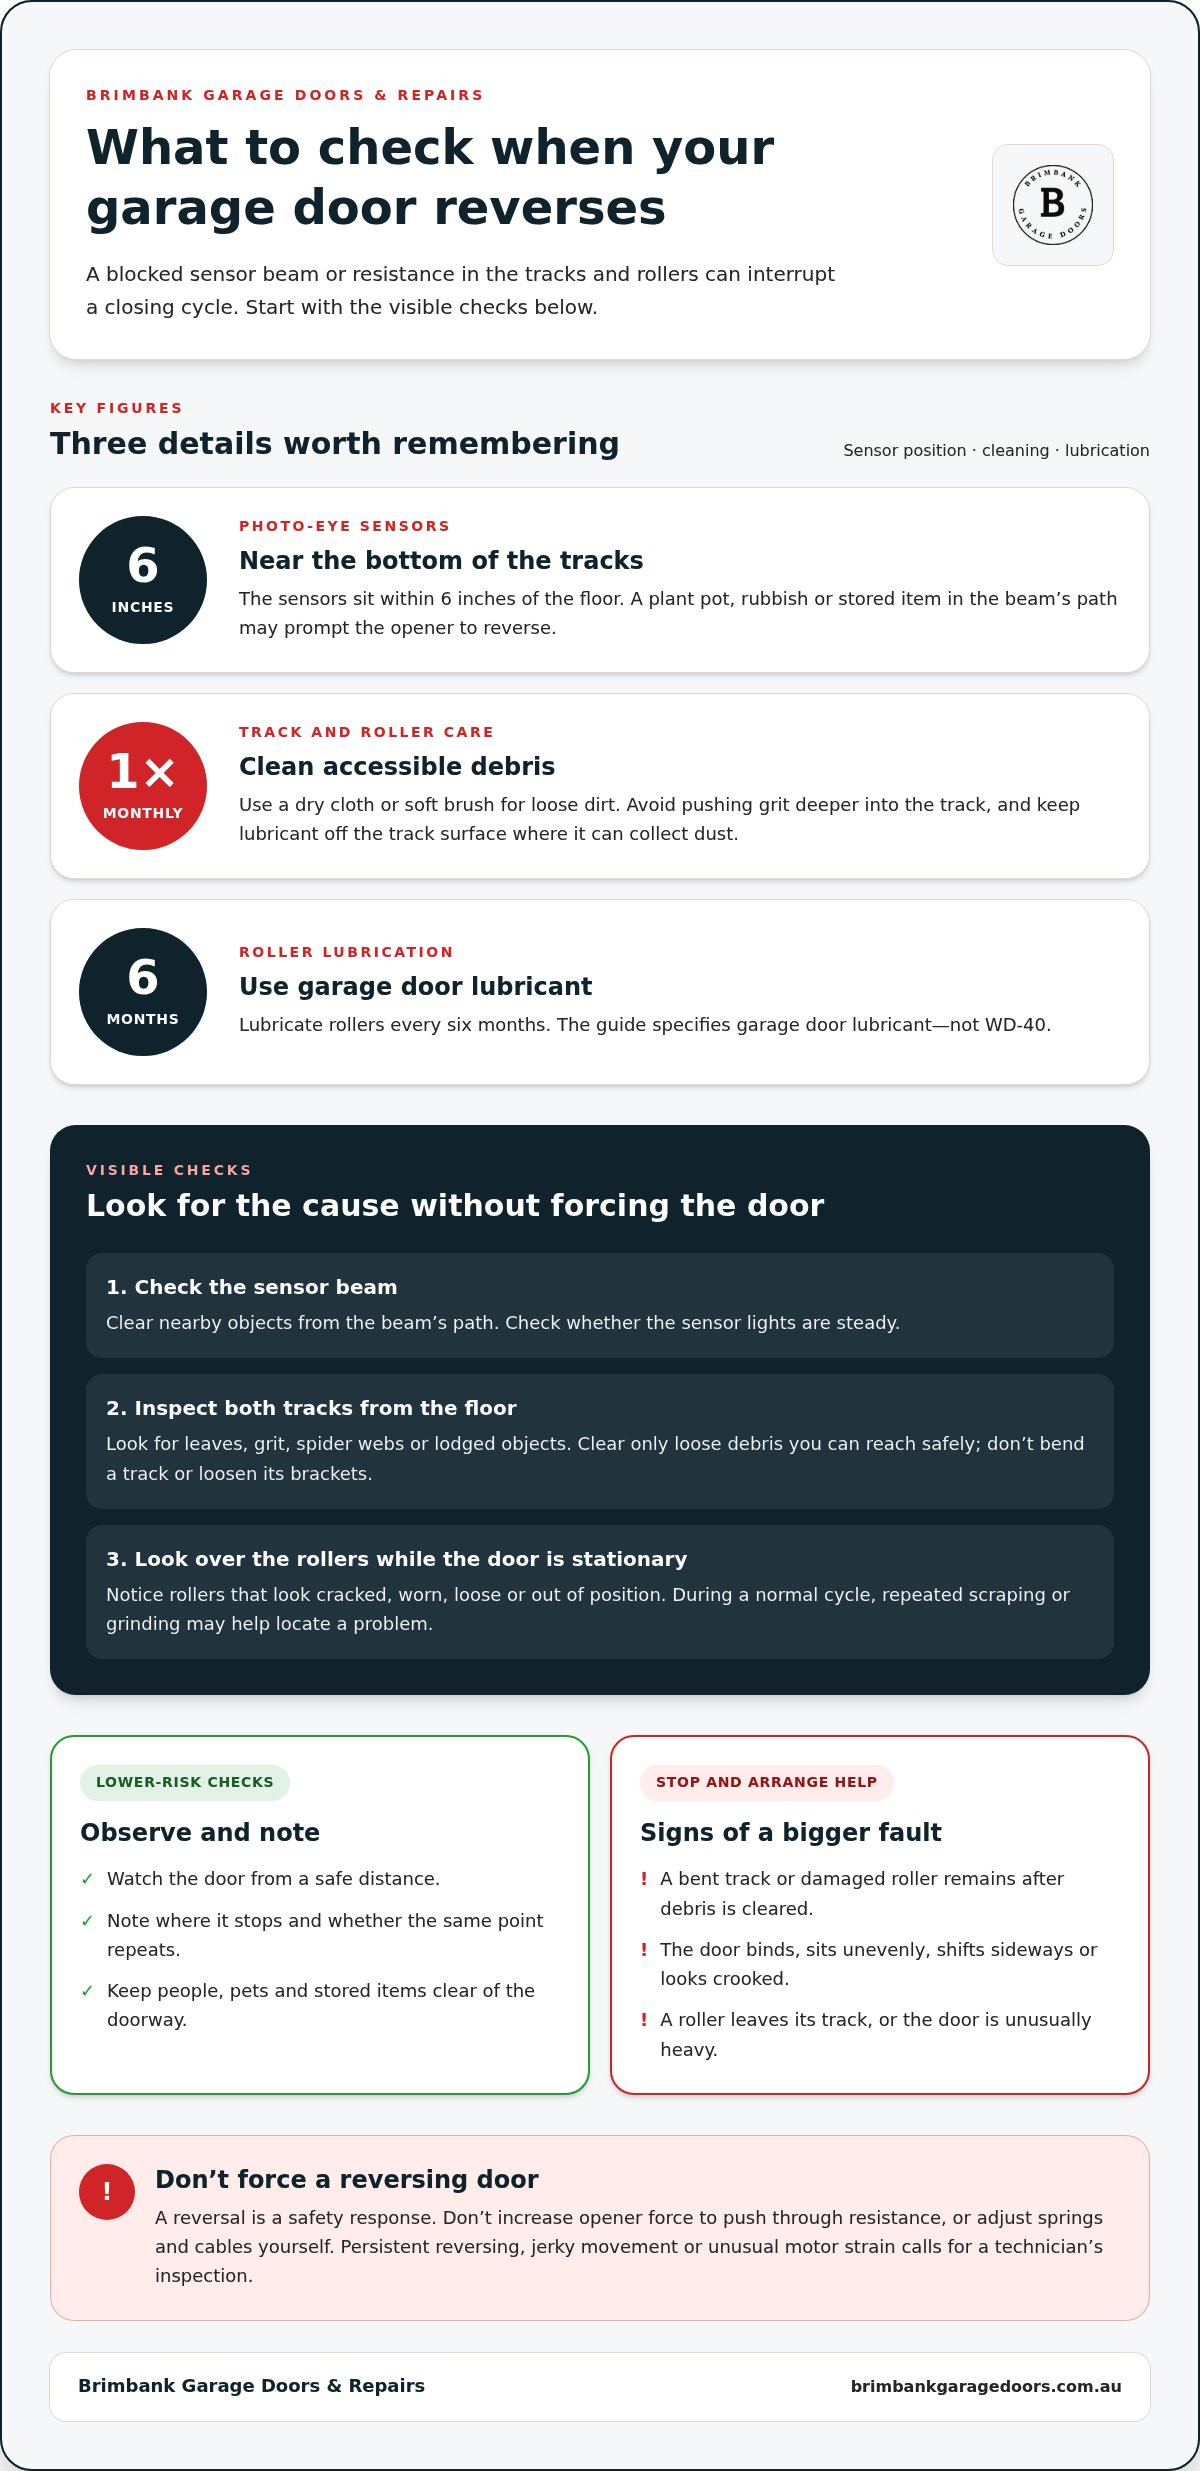
- Clear the area around the sensor beam as well. Photo-eye sensors sit near the bottom of the tracks, within 6 inches of the floor. A plant pot, rubbish or stored item in the beam’s path may prompt the opener to reverse, even when the tracks themselves look clear. Remove nearby objects, then observe whether the door’s behaviour changes during its next cycle.
- Clean accessible debris from the tracks and rollers monthly. Use a dry cloth or a soft brush for loose dirt, and avoid pushing grit deeper into the track. Check for dented metal, rust, or a roller that wobbles as the door moves. Lubricate rollers every six months with garage door lubricant, not WD-40. Keep lubricant away from the track surface, where it can collect dust.
- Compare the left and right sides as the door moves. Note if a roller hesitates, jumps or makes a sharp noise at the same point. If the door shifts sideways or rubs against one track, it may be damaged or misaligned rather than simply obstructed. Stop operating it if a roller leaves its track or the door appears crooked.
- Arrange an inspection if a bent track, damaged roller or repeated scraping remains after visible debris is cleared. These faults can put extra strain on the opener and affect controlled movement. For a roller door with track or component damage, garage roller door supply may be relevant when replacement is needed. Don’t force a door that binds or sits unevenly.
Safe troubleshooting and when to call a technician
Limit checks to visible, low-risk causes. Stop if the door is crooked, unusually heavy or making sharp noises.
- Keep people, pets and stored items clear of the doorway before testing. Use the wall button from a position where you can see the door without standing beneath it. Stop the test if the door jerks, hangs or reverses repeatedly. Don’t try to catch, hold or push a moving door. A clear view lets you note symptoms without approaching moving parts.
- Switch off power before resetting or cleaning photo-eye sensors. Follow the opener manual, then restore power and test with the wall button and remote. If the door works with one control but not the other, record the difference. Don’t bypass or disable the safety sensors to make the door close. They detect objects in the door’s path.
- Let an opener motor cool for 15-30 minutes if it has overheated. Then test the door once using its usual control. If the motor strains, stops again or smells hot, switch off power and stop operating it. Repeated attempts can add strain without addressing the cause. Note whether the problem followed several cycles or began on the first attempt.
- Leave springs, cables and opener force settings alone. Springs carry high tension, and a slipping or frayed cable can affect the door’s support. Don’t loosen brackets, wind springs or increase force to push through resistance. If you see a loose cable, a gap near a spring or an uneven door, keep clear and arrange a technician’s inspection.
- Contact a garage door technician if the door keeps reversing after you clear visible debris and reset the sensors. Do the same if you hear grinding or repeated jolts, the door drops, or a roller is outside its track. These symptoms can indicate mechanical faults that aren’t safe to fix with household tools. Explain when the fault happens and what you observed.
- Arrange an annual professional inspection to identify worn parts, safety hazards and necessary repairs. Ask for the opener, tracks, rollers, cables and springs to be checked. Report recurring reversals, even if the door closes on another attempt. A technician can assess how the opener and door work together instead of treating each symptom in isolation.
- Before the appointment, note whether the door stops halfway, near the floor or at varying points. Include any changes in sensor lights, unusual sounds, and whether the wall button and remote behave differently. These details give the technician a clearer starting point. Don’t use the door if it appears unstable, and don’t disconnect it for manual operation unless the manual directs you.
Cleaning and aligning photo-eye sensors
Photo-eye sensors sit near the bottom of the tracks, within 6 inches of the floor. Their invisible beam tells the opener to stop and reverse if blocked or misaligned.
- Switch off power to the opener before cleaning or resetting its sensors. Follow the opener manual to isolate power safely. Find the two sensor units near the bottom of each track and check their lenses for dirt, spider webs or water marks. Gently wipe each lens with a soft, dry cloth. Avoid pulling cables or twisting sensor brackets while cleaning.
- Clear the beam between the sensors, including plants, stored items and debris near the doorway. A plant pot beside a track can interrupt the invisible beam even if nothing is directly under the door. Remove objects from the sensor path, then make sure nothing can swing or roll back into it during a closing cycle.
- After restoring power, check both indicator lights. Blinking or unlit lights can signal that the photo-eye sensors aren’t aligned or receiving a clear beam. Check that each unit faces the other across the doorway. Don’t assume one steady light means both sensors are working correctly; compare the indicators on both sides before testing.
- Adjust a sensor bracket only if its light is blinking or off and the manual permits adjustment. Gently move the bracket until both indicator lights stay steady. Small movements can shift the beam, so don’t bend the bracket or force it into position. If a bracket is loose, bent or won’t stay aligned, stop rather than improvising a repair.
- Restore power and test the door with the wall button, then the remote. Keep clear of the doorway while it moves. If it still reverses, note whether the sensor lights stay steady and whether the reversal occurs at the same point. This can help distinguish a sensor issue from another fault in the opener or door.
- Test the safety response by placing an object in the sensor beam while the door is closing. The door should reverse when the beam is interrupted. Keep your hands and feet clear, and never use a person or pet as the test object. If the door doesn’t reverse, stop using it until its safety system is inspected.
- Clean the sensor lenses and nearby area monthly to reduce dust and debris. If the indicator lights keep blinking after cleaning and alignment, or the door fails the object test, don’t bypass the sensors. Leave the opener switched off if safe to do so, and arrange a professional inspection of the sensor system.
Worn springs, rollers, cables and tracks
Worn hardware can make a door bind or lose balance. Springs commonly last 7-10 years, but visible damage matters more than age alone.
-
Inspect springs and cables for wear
From a safe distance, look for a visible gap in a spring, frayed cable strands or a loose, hanging cable. These signs may mean the door isn’t properly supported. Don’t touch, loosen or adjust springs and cables: their tension can cause serious injury. A spring’s age can provide context, but its condition and the door’s movement are important clues too.
-
Inspect rollers and tracks for wear
Watch the rollers move along both tracks during a normal cycle. Look for cracked or wobbling rollers, uneven movement or a track that appears bent. Note where scraping or grinding starts, especially if it happens at the same point each time. Don’t loosen brackets or pull a roller back into place. A roller off its track can make the door unstable.
- Check whether the door moves evenly, without standing beneath it. A crooked door, sudden drop or uneven gap may indicate a balance or support problem. Stop operating it if one side hangs lower, a cable is slack or a spring shows visible damage. Repeatedly trying the opener won’t fix worn hardware and can put extra strain on the system.
- Use a balance test only if the door appears intact and the opener manual explains the procedure. With the door fully closed, disconnect the opener as directed, then carefully lift the door halfway. A balanced door should stay in place. If it falls or rises, the springs need professional adjustment. Don’t try this if the door looks damaged, feels unusually heavy or moves unpredictably.
- Pay attention to the door as you lift and lower it. A sticking roller may cause a localised catch, while an unbalanced door can feel heavy throughout its travel. Note where the movement changes and whether the door stays level. Stop if you feel strong resistance, hear a sharp noise or see a cable shift. Don’t force the door through a sticking point.
- Arrange professional help for worn springs, frayed cables, damaged rollers or bent tracks. Spring adjustment and cable repair aren’t safe DIY tasks, even if the door still moves. Describe the visible wear and where the door stops. For a damaged spring, arrange garage door spring repairs so the door’s support can be assessed and restored safely.
Brimbank Garage Doors & Repairs: Garage Door Installation
When safe checks don’t resolve a door that stops before closing, Brimbank Garage Doors & Repairs provides garage door repairs for common faults, including worn components and uneven movement. Its garage door maintenance service can help identify wear and keep moving parts in working order. If the door is damaged beyond practical repair, garage door installation may be the next step. The right option depends on the door’s condition and the fault identified.
Share what you’ve observed, such as where the door stops, whether it reverses, and any unusual noise. That gives the team useful details to assess the problem. Contact Brimbank Garage Doors & Repairs or visit brimbankgaragedoors.com.au.
Take the next step towards a dependable door
If you’re still wondering why your garage door stops before closing, use your observations to guide the next step. Describe when the fault occurs, how the door moves and whether it keeps happening. This can help focus attention on the right repair. Avoid repeated operation if the door seems unstable; protecting the door and household comes first.
Brimbank Garage Doors & Repairs provides garage door repairs for persistent faults, maintenance for ongoing care and installation when replacement is the practical option. Choose the support that matches your door’s condition instead of pushing it through another cycle.
Contact Brimbank Garage Doors & Repairs to discuss the door’s symptoms and a suitable next step. With a clear assessment and the right work, you can move towards a door that operates reliably and helps keep your home secure.
Frequently Asked Questions
How do I reset the sensors on my garage door?
Follow the opener manufacturer’s reset instructions, as the sequence varies by model. First, switch off power to the opener, then check the sensor lenses, wiring and brackets for visible issues. Restore power only after these checks. If the indicator lights remain abnormal or the door still behaves unpredictably, stop testing and arrange an inspection. A sensor reset won’t fix damaged wiring or a faulty opener component.
Is it okay to disable safety sensors?
No. Keep the safety sensors enabled because they’re designed to detect objects in the door’s path and prompt the opener to stop or reverse. Disabling them removes that protection and can expose people, pets or belongings to a closing door. Don’t tape over a lens, disconnect a wire or use a bypass workaround. If the sensors prevent normal operation, address the fault instead.
What are the most common reasons a garage door stops before closing?
Common causes include an interrupted sensor beam, misaligned photo-eye sensors, debris or damage along the tracks, worn rollers, incorrect travel limits, or resistance from worn springs and cables. Note whether the door reverses at the same point, whether it closes with another control, and whether the opener sounds strained. These details can help distinguish a sensor interruption from a movement or balance issue.
How do dirty or misaligned photo-eye sensors stop a garage door from closing?
Photo-eye sensors send an invisible beam across the doorway. Dust on a lens, an object in the beam or misalignment can interrupt the signal. The opener may interpret this as an obstruction and stop or reverse instead of continuing to close. For example, a bin beside a sensor can block the beam even when the floor beneath the door is clear.
How can I check and realign garage door safety sensors?
Check that nothing blocks the beam and that both sensor lenses are clean. Check the indicator lights against the opener manual’s instructions. If a light blinks or goes out, gently adjust the bracket only if the manual explains how. Once aligned, test the door using its controls, then check that it reverses when an object interrupts the beam. Don’t use a person or pet for this test.
Can an obstruction, damaged track, or binding rollers cause a garage door to reverse?
Yes. A small obstruction can catch a roller, while a bent track or binding roller can create resistance as the door moves. The opener may respond by stopping or reversing. For example, repeated scraping at one height can indicate a localised movement problem rather than a sensor fault. Clear loose debris within safe reach, but don’t bend tracks, loosen brackets or force rollers back into place.
How do I adjust garage door close-limit settings safely?
Use the opener manual to identify the close-limit control and adjustment sequence. Record where the door stops before changing anything, and don’t guess which way to turn a dial or press a button. Travel limits control where the opener stops the door; they don’t remove physical resistance. If the door binds, moves unevenly or still reverses, stop adjusting and have the system inspected.
Why does a garage door close partway and then reopen?
A door that closes partway and reopens may be responding to an interrupted safety beam, resistance along its path or a mismatch between the opener’s settings and the door’s movement. Note whether it reverses at the same height each time and whether the opener strains or makes unusual noises. If it continues after you remove visible obstructions, repeated cycling won’t identify or fix the underlying fault.